- russian
- luganda
- maithili
- maori
- marathi
- norwegian
- oromo
- persian
- polish
- portuguese
- quechua
- korean
- shona
- sindhi
- singapore
- spanish
- tamil
- thai
- turkish
- ukrainian
- urdu
- vietnamese
- english
- arabic
- aymara
- basque
- belarusian
- bengali
- cebuano
- czech
- danish
- deutsch
- dutch
- afrikaans
- filipino
- finnish
- french
- galician
- hindi
- indonesian
- irish
- italian
- japanese

Honestly, the whole industry’s been going crazy over these pre-fab walnut panels lately. Everyone’s chasing speed, right? Less labor, faster build times. But lemme tell ya, I’ve seen a few projects where they skipped on the details, and the result… well, let's just say it didn’t smell like fresh walnut. More like regret. You think you're saving time, but fixing a botched install eats up twice as much.
And the designs! Have you noticed everyone’s trying to get “clever” with the joinery? Hidden fasteners, interlocking edges… Sounds fancy on paper. But in the real world, on a windy construction site, those things can loosen, shift, and cause all sorts of headaches. Simple dovetail joints, properly executed? Always reliable. Always. I learned that from Old Man Hemmings, back when… nevermind.
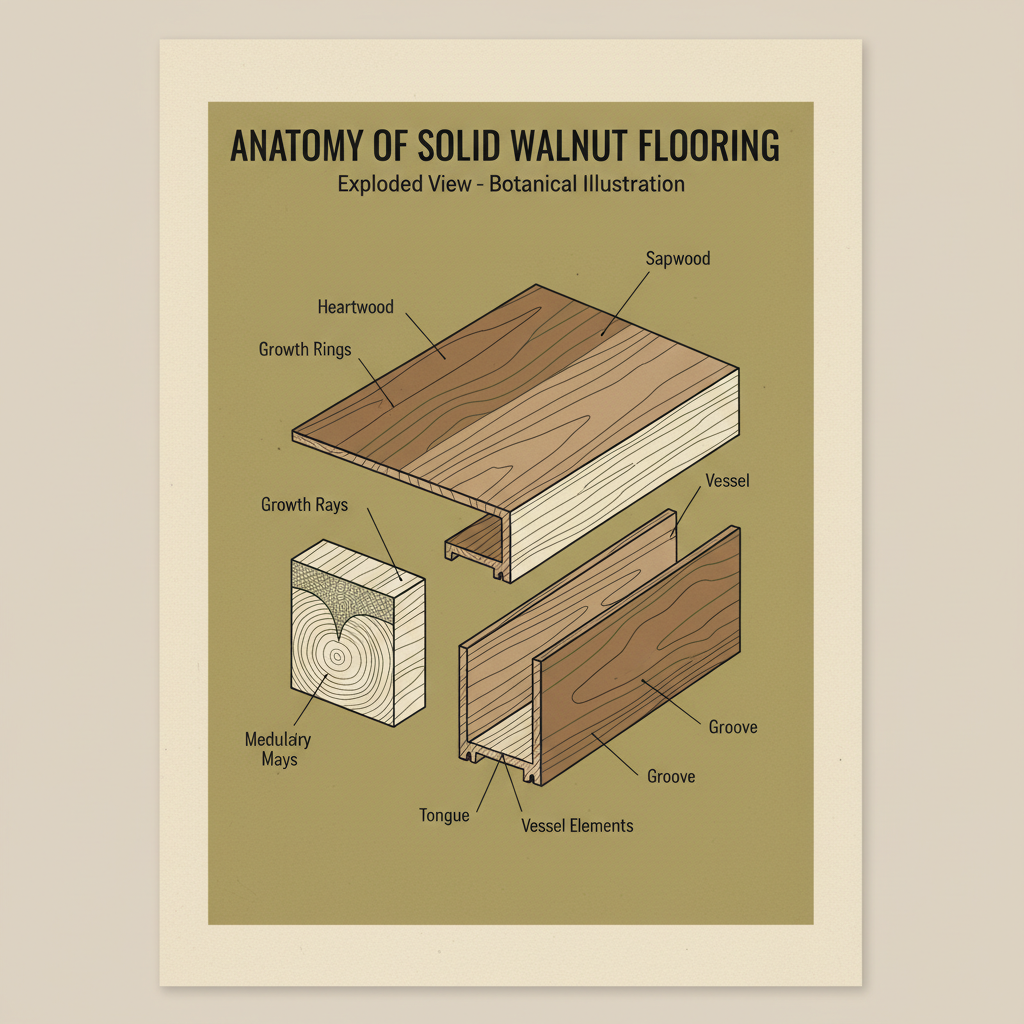
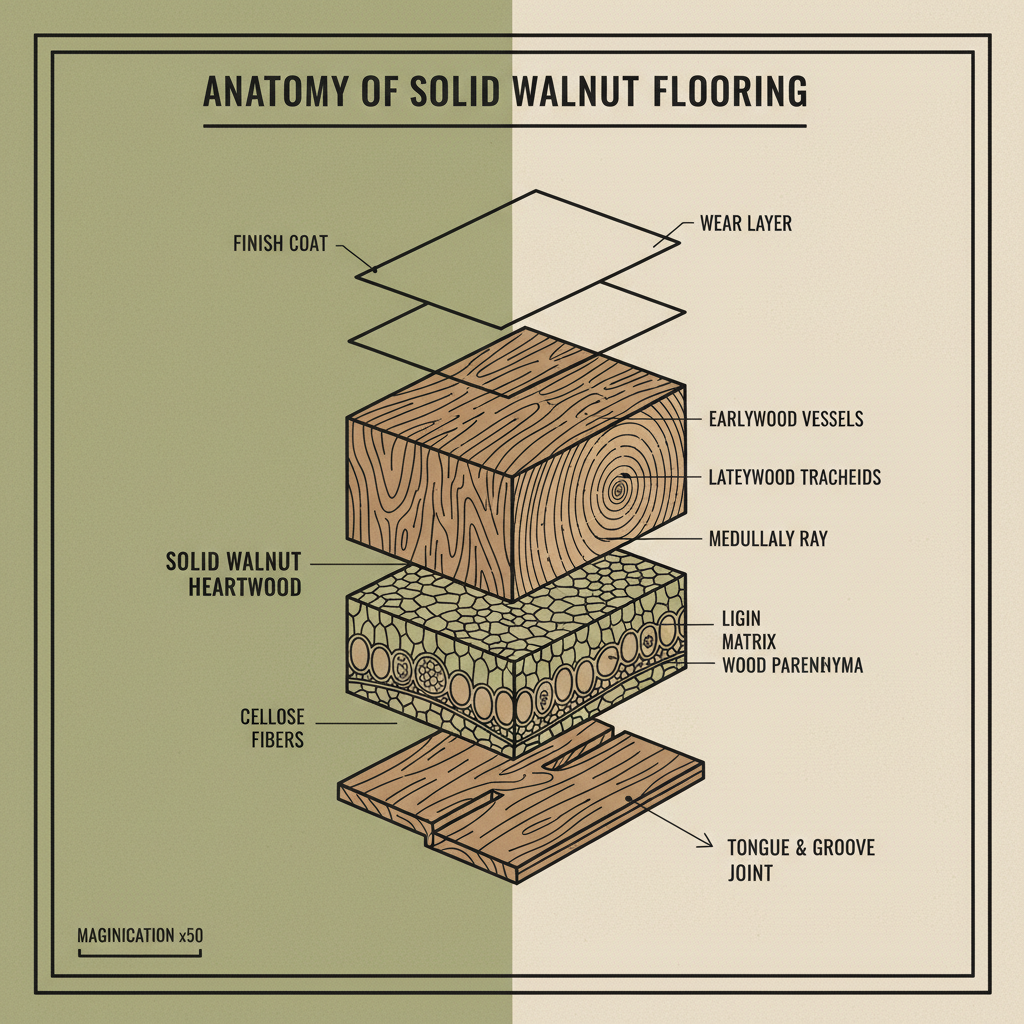
The walnut itself, though. That's where it gets good. We're mostly using American Black Walnut, obviously. It’s got this rich, dark color, a smell… a proper wood smell, not that chemical stuff you get with some veneers. You can tell a good piece just by the weight. It feels substantial, you know? And the grain...it's like every board tells a story. I was at the Miller & Sons mill last fall, the scent of freshly cut walnut hung in the air for miles. It's a good smell, a real smell.
Industry Trends and Design Pitfalls
Strangely, a big trend I've seen is companies trying to minimize waste. Which sounds great, right? But they're doing it by using thinner boards, relying on more glue, and hoping for the best. You lose that solid, substantial feel. And honestly, you get less room for refinishing down the line. It's a false economy. Later… forget it, I won’t mention it.
And the obsession with minimalist profiles? Makes it look sleek, sure. But it drastically reduces the surface area for adhesive, which is crucial, especially with wider planks. I encountered this at the Apex Flooring factory last time – they were having serious delamination issues. Just…not enough glue surface. Simple fix, but they were too focused on aesthetics.
FAQS
For a kitchen, you want something durable and water-resistant. I usually recommend a polyurethane finish, specifically a water-based one. It’s easier to apply, lower in VOCs, and provides good protection against spills and stains. Oil-based polyurethanes are tougher, but they yellow over time and take longer to dry. Avoid wax finishes in kitchens – they offer little protection and require frequent reapplication. And don't skimp on the coats – at least three is best.
Scratches are inevitable, but you can minimize them. Use furniture pads under all legs. Area rugs in high-traffic areas are essential. Avoid wearing high heels indoors – seriously! And regularly sweep or vacuum to remove dirt and grit, which act like sandpaper. A matte finish can also help hide minor scratches better than a glossy one. Don't get hung up on perfection, though – a little wear adds character.
Honestly, it's not ideal. Bathrooms are high-humidity environments, and walnut is susceptible to moisture damage. If you must use it, you need to ensure excellent ventilation, apply multiple coats of a waterproof finish, and be diligent about cleaning up any spills immediately. Engineered hardwood is a much better choice for bathrooms – it’s more stable and less prone to warping. But a good contractor can sometimes make it work.
Experience is key. Find someone who has installed walnut flooring before, and ask to see examples of their work. Check their references. Make sure they’re properly insured and licensed. And get a detailed written contract that outlines the scope of the work, the materials being used, and the payment schedule. Don’t just go with the cheapest bid – quality matters. I’ve seen too many disasters caused by cutting corners.
Keep it simple. Regular sweeping or vacuuming to remove dirt and debris. Damp-mop with a pH-neutral cleaner specifically designed for hardwood floors. Avoid harsh chemicals, abrasive cleaners, and excessive water. And consider using a wood conditioner periodically to replenish the natural oils in the wood. Don't let spills sit – wipe them up immediately. Common sense goes a long way.
Yes, but it requires careful preparation. The concrete needs to be level, clean, and dry. You'll likely need to install a moisture barrier to prevent moisture from wicking up through the concrete. And you'll need to use a suitable subfloor – plywood or OSB – to provide a stable base for the walnut flooring. It’s a bit more involved than installing over wood subflooring, but it’s definitely doable. Just make sure you have a professional assessment first.
Conclusion
Ultimately, solid walnut flooring is a beautiful, durable, and classic choice. It adds value to a home and creates a warm, inviting atmosphere. But it's not a miracle product. It requires proper installation, regular maintenance, and a realistic understanding of its limitations. It's a commitment, not just a floor covering.
And let's be honest, no matter how much we talk about finishes and moisture content and installation techniques, the worker will know the moment he tightens the screw if it’s gonna work. That’s the truth of it. And if you listen to the workers, you'll learn a lot.


Ethan Reynolds
If you are interested in our products, you can choose to leave your information here, and we will be in touch with you shortly.


